Vacuum cleaners have been around since 1908, when James Spangler sold his electric broomstick idea to William Hoover.
However, although Hoover vacuum technology has come a long way since then, some Hoover vacuum cleaners simply break sooner than others.


Don’t worry, though!
If your Hoover vacuum stopped working, there are a few things you can try.
In this post you will learn:
- Possible reasons why your Hoover vacuum cleaner no longer turns on
- Step-by-step tests to perform
- And more!
You can use this guide to fix any Hoover vacuum model, so let’s get started 🙂
Hoover Vacuum Stopped Working: In a Nutshell
If your Hoover vacuum stopped working, it might be due to a defective power cable, a faulty switch, a blockage in the hose, a jammed motor, or other factors. Clogs are the most prevalent cause of Hoover vacuums not turning on. However, you should inspect each Hoover vacuum component in sequence, starting with a test of the power outlet and breakers.
Continue reading to go through my comprehensive step-by-step guide.
Alternatively, you can watch this fantastic video by electronicsNmore.
Though it is not exactly your Hoover vacuum cleaner, the principles are the same:
How Do You Fix A Hoover Vacuum That Won’t Turn On?
A Hoover vacuum cleaner that no longer turns on can be a nightmare for households that depend on these machines!
If you are very frustrated that your Hoover vacuum stopped working, follow the guide below in order to fix your machine in no time.
1. Ensure The Circuit Breaker Has Not Tripped
The first thing you should do is check to make sure that the circuit breaker has not tripped.
If it is tripped, flip it back on and try to turn your Hoover vacuum cleaner on.


If the breaker has not tripped, try step 2.
2. Test The Power Outlet
Sometimes your Hoover vacuum cleaner may no longer work due to a malfunctioning power outlet.
Here are some tests you can perform:
- Wiggle your Hoover vacuum power cord and make sure that it is not falling off the outlet.
- Push the power plug until it is secured and connected to the power outlet.
- Unplug the cord and plug it in again.
- Test if your power socket is working by plugging another device in the source. If the other device works, then the power outlet is not the issue.
3. Check If Your Hoover Vacuum Battery Needs Charging
Not all Hoover vacuums have batteries, but if yours does, then it could be flat or no longer in good working order.
Simply plug your Hoover vacuum in the power outlet to see if the battery is the issue.


If the battery needs replacing, make sure you go for original parts.
4. Empty The Dustbin
If your Hoover vacuum stopped working, it could simply be due to the dustbin being too full.
A full dustbin cause the motor to work harder and prevent your Hoover vacuum from turning on.
Make sure you empty your Hoover vacuum dustbin after each use or before it reaches full capacity.
5. Ensure Your Hoover Vacuum Hose Is Not Clogged
The hose is located between the canister and the floor nozzle.
When clogged, it can cause your Hoover vacuum to lose suction or to stop working altogether.
How to unclog a Hoover vacuum hose
- Unplug your Hoover vacuum cleaner
- Detach the hose from both the canister and the floor nozzle
- Locate the blockage in the hose and use a screwdriver to clear it out
- If the blockage is stubborn, you may need to use the pliers to remove it
- If the blockage is right in the middle of your Hoover vacuum hose, you can use a broomstick to clear it out
- Once the blockage is cleared, reassemble your Hoover vacuum cleaner and test it out


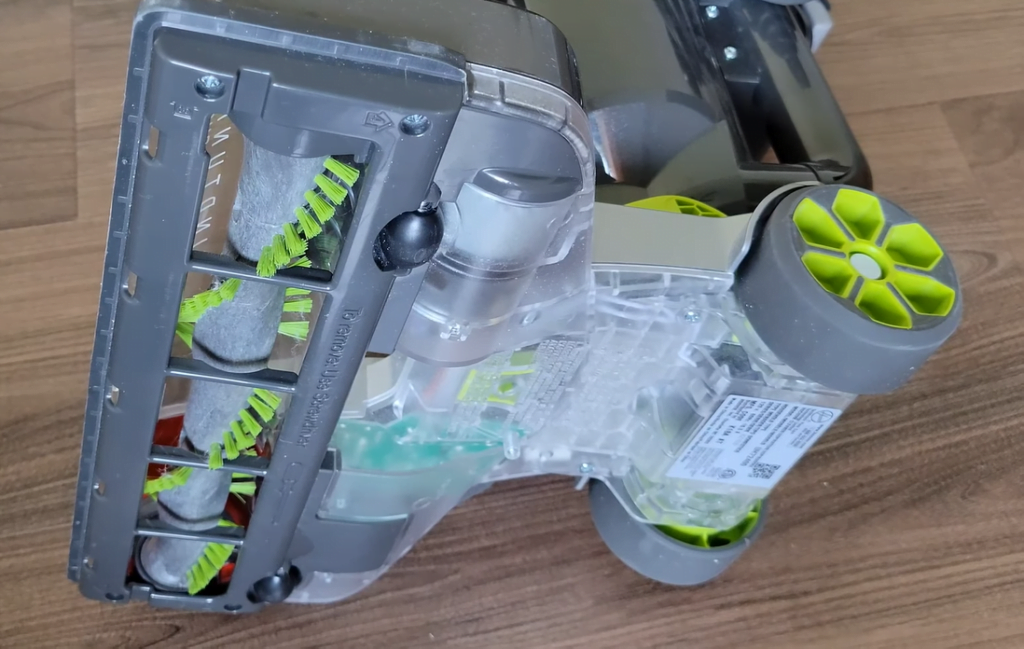
6. Check Your Hoover Vacuum Roller Brush
The roller brush is the part of the Hoover vacuum that helps to agitate the carpet and loosen dirt and debris.
It is located under the Hoover vacuum cleaner head.
Clumps of hair wrapped around the roller can cause your Hoover vacuum to stop working.
To clean your Hoover vacuum roller brush, do the following:
- First remove any hair or debris that may be wrapped around it
- Then, use a small brush or toothpick to remove any dirt or debris that may be stuck in the bristles
- Finally, run the roller brush under warm water to remove any remaining dirt or debris.
Make sure you let the roller brush dry up completely before putting it back in your Hoover vacuum cleaner.
7. Wash or Replace Your Hoover Vacuum Filter
The filter is usually located near the top of the Hoover vacuum cleaner, near the dustbin.
Some Hoover vacuums can have two filters: a pre-motor filter and a post-motor filter.
In addition, some filters can be washable while others can only be replaced.
Washable filters
- Remove the filter and rinse it under running water, or machine wash them if the manufacturer allows it
- Let the filter dry naturally, preferably for 24 hours or until fully dry
- Put the filter back into your Hoover vacuum cleaner.
Replaceable filters
If your Hoover vacuum filters cannot be washed, replace them periodically as per the manufacturer’s instructions to maintain your machine’s performance.
8. Check If Your Hoover Vacuum Power Cord Is Damaged
For safety reasons, always unplug your Hoover vacuum cleaner’s power cord from the outlet before conducting an inspection.
Once it is unplugged, inspect the cord for any damage.
If you see any frayed wires or exposed insulation, do not attempt to repair it yourself. Instead, take it to a qualified technician for repair.
However, if you decide to do it yourself (you’ll be solely responsible for this), here is how to replace it:
- Unplug the Hoover vacuum cleaner from the outlet
- Remove the old power cord by disconnecting it from the motor housing and/or other parts of the Hoover vacuum cleaner
- Once disconnected, thread the new power cord through these same areas and reattach it to the motor housing and/or other parts of the Hoover vacuum cleaner
- Finally, plug your Hoover vacuum cleaner back into the outlet and test it out!
Here is a video from FIX Tech Guides that shows how to do it:
9. Test Your Hoover Vacuum Switch
Your Hoover vacuum switch controls the flow of electricity that goes to the motor.
When you turn on your Hoover vacuum cleaner, the switch sends electricity to the motor, which starts the suction process.
So if your Hoover vacuum stopped working, it could be due to a faulty switch.
How to test a Hoover vacuum switch
To test whether your Hoover vacuum switch is working properly, make sure that there is power going to the switch.
You can do this by using a multimeter to check for continuity between the two terminals on the switch.
- If there is continuity, then the switch is working properly.
- If there is no continuity, then the switch needs to be replaced.
How to replace a Hoover vacuum switch
If your Hoover vacuum cleaner’s switch needs to be replaced, do the following:
- First disconnect the power cord from the machine
- Then remove the screws that hold the switch in place and carefully pull the switch out of its housing
- To install the new switch, simply reverse these steps.
10. Inspect Your Hoover Vacuum Motor To See If It Is Jammed
Your Hoover vacuum may have stopped working due to its motor being jammed.
This can happen if you have tried to use your Hoover vacuum as a replacement for a shop vac.
For example, you may have tried to vacuum metal shavings or plaster dust!
Another possible cause is that you have been using your Hoover vacuum cleaner without the filter.
This would have allowed for debris to make their way through to the motor.
How to clean your Hoover vacuum cleaner motor
- Unplug your Hoover vacuum cleaner and remove the housing. This will give you access to the motor
- Use a Phillips head screwdriver to remove the screws that hold the motor in place
- Carefully remove the motor from the housing and set it aside on a clean surface
- Use a flat head screwdriver to remove any dirt or debris that may be caught in the brushes of the motor. Be sure to clean both sides of the brushes thoroughly
- Once the brushes are clean, apply a few drops of Hoover vacuum cleaner oil to each one. This will help keep them working properly and extend their life span
- Reassemble your Hoover vacuum cleaner and test it out
11. Contact Hoover
Whether you have tried all the previous steps or not, you may want to check whether your Hoover vacuum cleaner is still under warranty and contact the manufacturer.
They will be able to advise further, repair your machine, or replace it if necessary.
12. Call a Professional
If you have tried troubleshooting but your Hoover vacuum and it still does not work, AND your Hoover is no longer under warranty, it may be time to call in a professional.
A professional will be able to diagnose the problem and determine whether it can be fixed or if you need a new Hoover vacuum cleaner.
They should be able to give you an estimate of how much it will cost to fix the problem.
Conclusion
With a little bit of troubleshooting, you can fix most Hoover vacuum cleaner problems yourself.
To recap, if your Hoover vacuum stopped working, do the following:
- Check the circuit breaker has not tripped
- Ensure the power outlet your Hoover vacuum is plugged in works
- Check that your Hoover vacuum battery is not flat
- Empty the bag or canister
- Unclog the hose
- Clean the brush roller
- Wash or replace your Hoover vacuum filter/filters
- Inspect the power cord and let a professional replace it if needed
- Test the Hoover vacuum switch
- Clean your Hoover vacuum motor
If your Hoover vacuum is beyond repair, it may be time to buy a new one.
Be sure to do your research before making a purchase so you can find a machine that will last a long time!