Has your Shark vacuum cleaner stopped working? Don’t worry. There are a few things you can try before resorting to replacing your trusty machine 🙂
I know, because last year I bought one of these Shark vacuums and had to try these troubleshooting tips myself!


So sit back, grab a cup of coffee, and get ready to learn some troubleshooting tips that will make you the vacuum repair expert of your neighborhood!
In this blog post, you will learn:
- Possible reasons why your Shark vacuum cleaner no longer turns on
- Step-by-step tests to perform
- And more!
You can use this guide to fix any Shark vacuum model, so let’s get started 🙂
Shark Vacuum Stopped Working: In a Nutshell
If your Shark vacuum stopped working, it can be due to a number of reasons, including a faulty power cable or power switch, a clogged hose, and a jammed motor. When it comes to Shark vacuums not turning on, clogs are usually the culprit. However, I recommend you troubleshoot each Shark vacuum component to pinpoint any other potential issue.
I have put together a comprehensive step-by-step guide to help you get your Shark vacuum back up and running 🙂
Alternatively, you can watch this fantastic video by electronicsNmore.
The video was not specifically created for Shark vacuums, but the troubleshooting steps are going to be the same for all makes anyway:
How Do You Fix A Shark Vacuum That Won’t Turn On?
A Shark vacuum cleaner that no longer turns on can be a total bummer for households that rely on these cleaning powerhouses!
But before you throw in the towel, try the 10 steps below to fix.
Your Shark vacuum cleaner may have not died on you just yet!
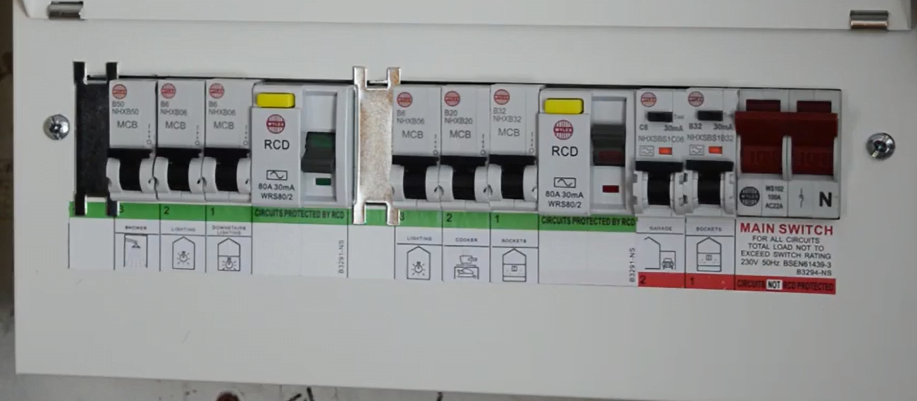
1. Ensure The Circuit Breaker Has Not Tripped
Checking if the circuit breaker has tripped should be the first thing on your troubleshooting list, as your Shark vacuum may have stopped working due to external factors.
Think of the circuit breaker as a safety guard – it trips when the electrical current flowing in your Shark vacuum cleaner becomes too high and could potentially cause damage.


So, before you start panicking, flip the breaker back on and see if your Shark vacuum cleaner comes back to life.
If the breaker hasn’t tripped, then it’s time to move on to step two!
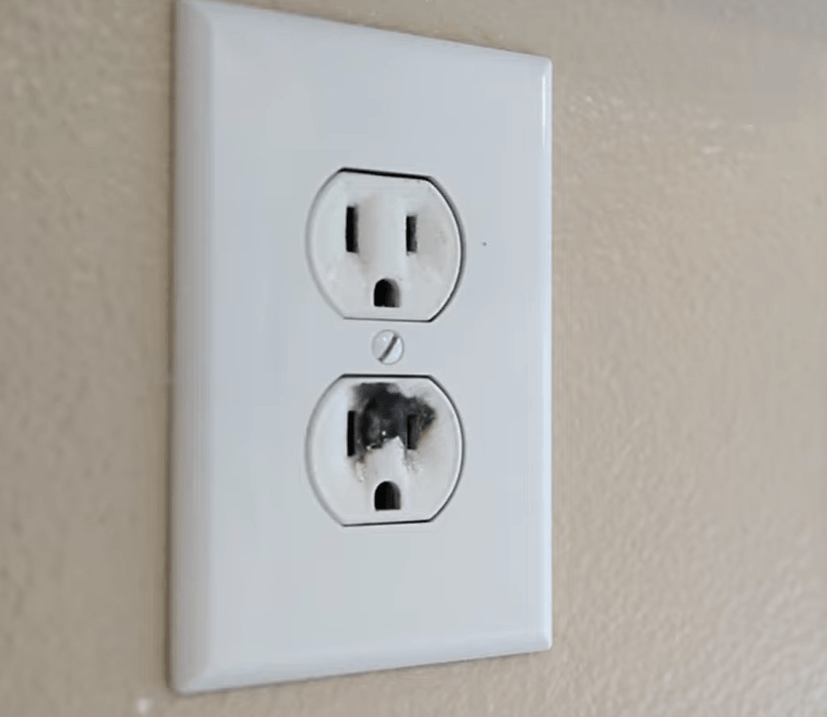
2. Test The Power Outlet
Sometimes your trusty Shark vacuum cleaner may stop working due to damage to the power outlet the machine is connected to.
Power outlets can malfunction for a variety of reasons such as overloading, electrical surges, or just general wear and tear.
Here is what you can try:
- Give the power cord a little shake to ensure it’s securely in the outlet
- Make sure the plug is fully pushed in and connected
- Unplug your Shark vacuum and plug it back in
- Finally, test the power outlet with another device to determine whether there is an issue with the outlet or with your Shark vacuum. For example, if you plug your phone into that outlet and the phone starts charging, chances are your vacuum is the issue.
3. Check Your Shark Vacuum Battery Charge Status
If you own a cordless Shark vacuum, its battery may be the reason why it no longer turns on.

A battery that is not properly charged will not have enough power to run the vacuum effectively. This can lead to the vacuum shutting down unexpectedly and decreased overall cleaning ability.
Put your Shark vacuum battery to charge for as long as it is recommended in the user manual.
If the battery does not charge, it is probably time to replace it with a new one.
Contact Shark to see if this is still covered under your warranty.
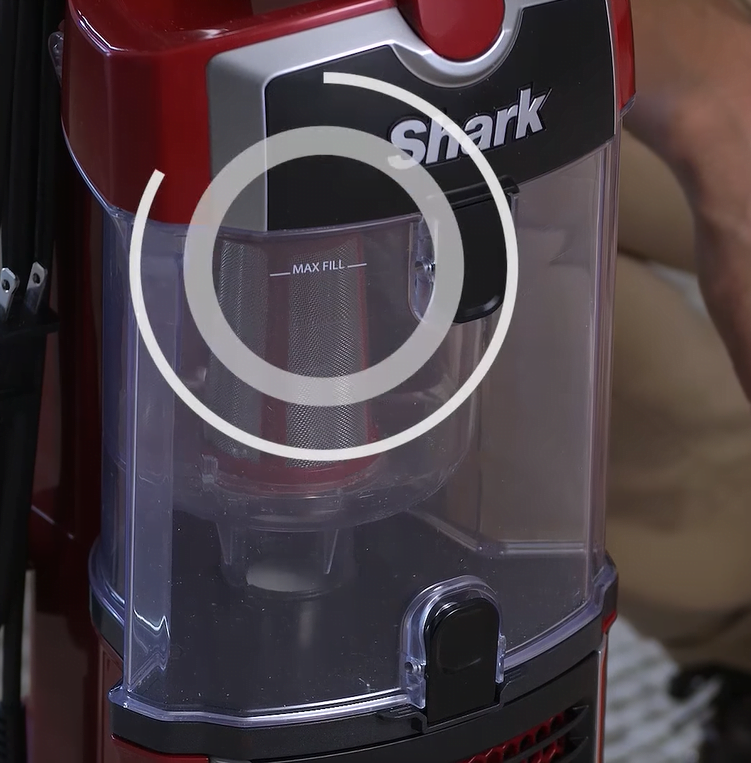
4. Empty Your Shark Dust Cup
If your Shark vacuum cleaner has stopped working, it could simply be because the dust cup is too full.
Vacuuming with an overfilled dust cup can put a major strain on your Shark vacuum motor, causing it to malfunction.
Ideally, you would want to empty the dust cup after each use or at least before it reaches full capacity (3/4 full).


5. Ensure Your Shark Vacuum Hose Is Not Clogged
The hose is located between your Shark vacuum’s main body and the attachment tools, typically at the front or side of the machine.
It serves as a connection point between the tools and the main unit, allowing suction to flow through the hose and into the attachment tools for cleaning.
When clogged, it can cause your Shark vacuum to lose suction or to stop working altogether.
How to unclog a Shark vacuum hose
- Unplug your Shark vacuum cleaner
- Detach the hose from the vacuum body and remove any attachments
- Grab a long object (such as a broomstick) to remove clogs all the way through the other end of the hose
- If you are dealing with a stubborn clog, you may need to use the pliers to remove it
- Once the blockage is cleared, reassemble your Shark vacuum cleaner and test it out
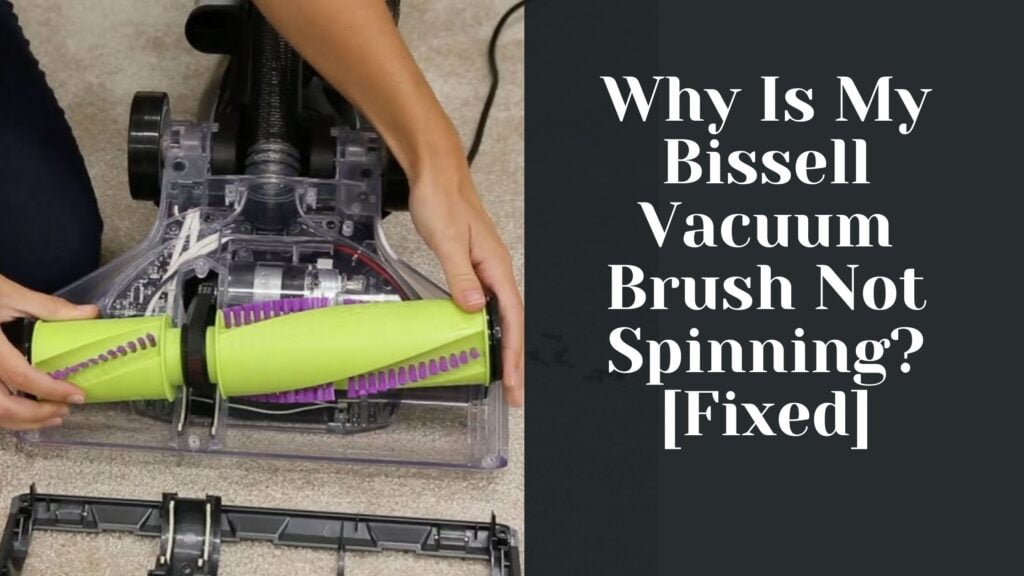
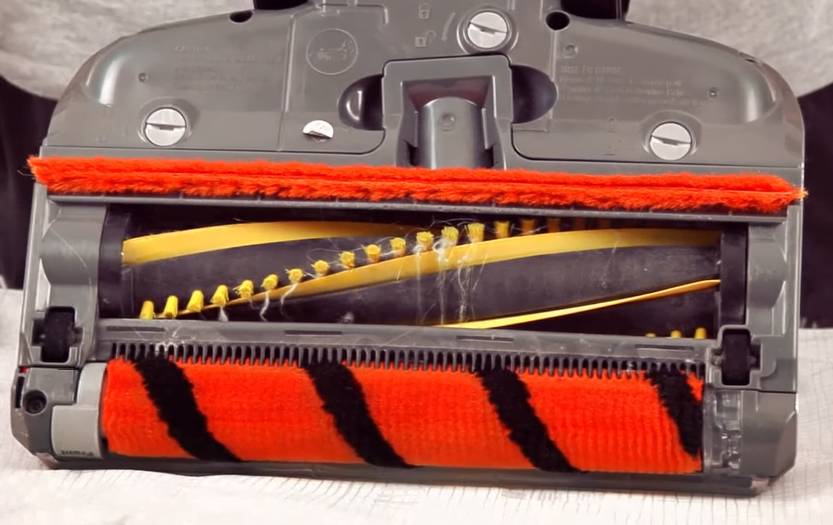
6. Check Your Shark Vacuum Roller Brush
The roller brush of your Shark vacuum cleaner plays a vital role in loosening dirt and debris from your carpet.
It can be found under the vacuum head and is essential for effective cleaning.
However, when hair clumps become tangled around the roller, it can cause your Shark vacuum to stop working.
Here is how to clean your Shark vacuum roller brush:
- Remove the plate at the bottom of the vacuum head
- Take the brush roller out and cut through the clumps of hair using a pair of scissors (I have a spare pair of these at home that I only use for this exact purpose!)
- Get rid of other small debris using your hands
- Rinse your Shark vacuum roller brush under warm water
- Let it air dry for at least 24 hours
- Re-install the brush roller and test your vacuum
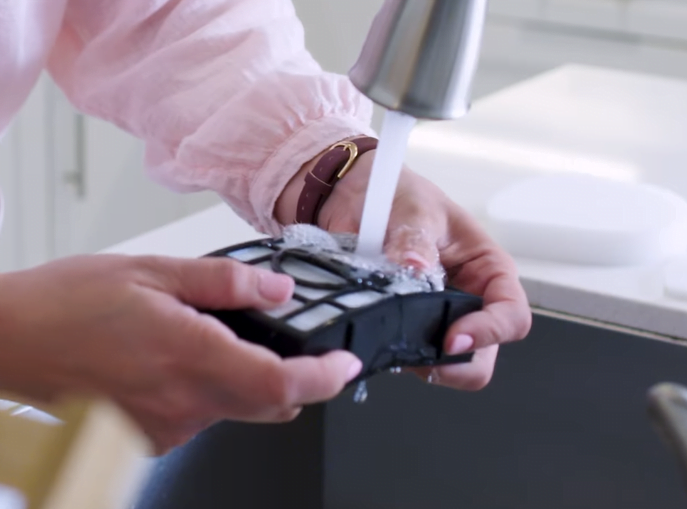
7. Wash or Replace Your Shark Vacuum Filter
Most Shark vacuums come with two filters:
- one pre-motor filter
- one post-motor filter (Usually HEPA)
The purpose of these filters is to trap dust, dirt, and other small particles that are sucked up by your Shark vacuum.
Not only do the filters help protect the motor, but they also help to prevent dust particles from being released back into the air, improving indoor air quality and protecting against allergies or other respiratory problems.
When filters are clogged, both your Shark vacuum motor and the indoor air quality are at risk.
That is why you should wash/replace the filters as per the user manual of your Shark vacuum.
Washable filters
- Remove the filter and rinse it under running water
- Let the filter dry naturally, preferably for 24 hours or until fully dry
- Put the filter back into your Shark vacuum cleaner
Replaceable filters
Shark recommends replacing pre-motor filters once every 3 months and HEPA filters once every 12 months.
However, you may need to do this more often if you use your vacuum multiple times a day, every day.
You can easily purchase Shark vacuum filters on Amazon by clicking here.
8. Ensure Your Shark Vacuum Power Cord Is Not Damaged
Always prioritize safety by unplugging your Shark vacuum power cord from the outlet.
Once unplugged, conduct a thorough inspection of the cord, looking for any signs of damage like frayed wires or exposed insulation.
If you spot any damage, let a professional replace the power cord for you.
However, if you’re feeling confident and want to tackle the replacement process yourself, here’s a simple guide to follow:
- Disconnect your Shark vacuum cleaner from the outlet
- Detach the old power cord from your Shark vacuum motor housing and other parts of the machine
- Replace the old cord with a new one by threading it through the same areas the previous cord was threaded into
- Check if your Shark vacuum cleaner turns on
Again, do not do this if you are not 100% sure. I cannot be held responsible if anything goes wrong!
Here is a video from FIX Tech Guides that shows the full cord replacement process:
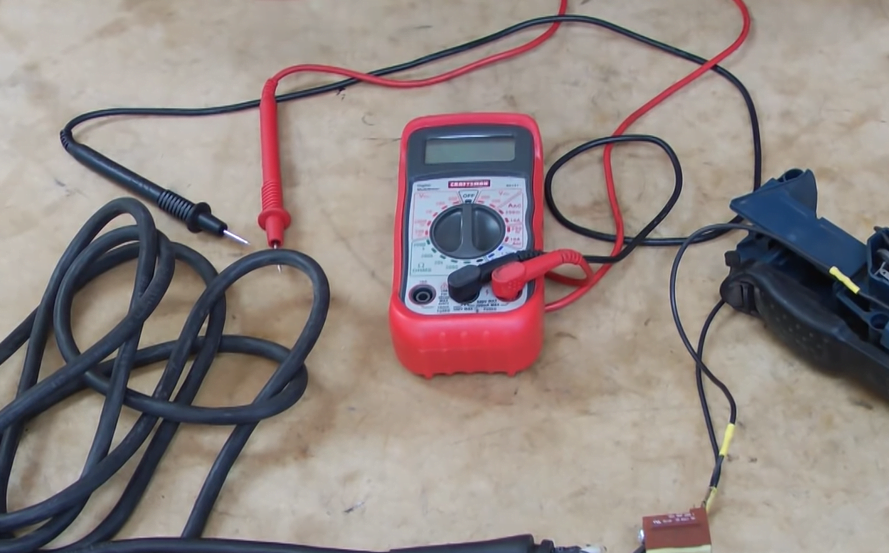
9. Test Your Shark Vacuum Switch
The switch of your Shark vacuum cleaner plays a crucial role as it sends electricity to the motor, allowing it to start working.
Therefore, if your switch is faulty, it will prevent your Shark vacuum from turning on.
How to test a Shark vacuum switch
To determine whether your Shark vacuum switch is faulty, grab a multimeter and test the continuity between the two terminals on the switch.
- If there is continuity, then the switch is working correctly
- If there is no continuity, the switch needs to be replaced
How to replace a Shark vacuum switch
If your Shark vacuum cleaner’s switch needs to be replaced, do the following:
- First disconnect the power cord from the machine
- Then remove the screws that hold the switch in place and carefully pull the switch out of its housing
- To install the new switch, simply reverse these steps.
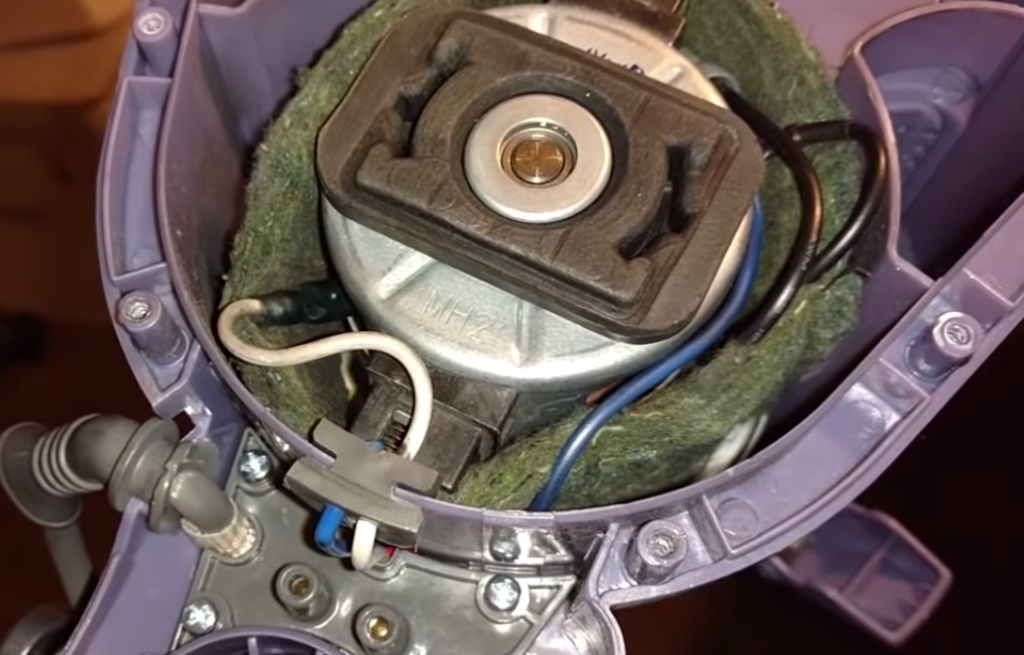
10. Inspect Your Shark Vacuum Motor
A jammed motor could also be the reason why your Shark vacuum stopped working.
Motors can become jammed when you try to use your vacuum for tasks they are not designed for, like sucking up metal shavings or plaster dust!
And you know what they say, an ounce of prevention is worth a pound of cure. So, you should always make sure to follow the manufacturer’s guidelines and use your Shark vacuum accordingly!
The motor can also get jammed if you use your Shark vacuum cleaner without the filter, as debris would easily make their way through to the motor.
How to clean your Shark vacuum cleaner motor
Please let an expert do this for you, since it is both a dangerous process and one that can void your Shark vacuum warranty!
However, if you do decide to go ahead and do it yourself, here is a step-by-step guide for you:
- Unplug your Shark vacuum cleaner and remove the housing. This will give you access to the motor
- Use a Phillips head screwdriver to remove the screws that hold the motor in place
- Carefully remove the motor from the housing and set it aside on a clean surface
- Use a flat head screwdriver to remove any dirt or debris that may be caught in the brushes of the motor. Be sure to clean both sides of the brushes thoroughly
- Reassemble your Shark vacuum cleaner and test it out
11. Contact Shark
If you’ve tried all my recommended steps above and your Shark vacuum cleaner is still not working, it may be time to contact the manufacturer.
In fact, your vacuum may still be under warranty, meaning that you should be able to get it fixed or replaced free of charge!
Click here to contact Shark and ask them for advice.
12. Call a Professional
If your Shark vacuum does not work despite trying everything above AND it is no longer under warranty, you may want to contact a professional.
They should be able to pinpoint any additional issues with your Shark vacuum cleaner and fix them for you.
Beware of the quote you get, though! As you may find it cheaper to just replace your vacuum with a new one at this point.
Conclusion
I hope this troubleshooting guide helped you identify and fix the issue.
To recap, if your Shark vacuum stopped working, do the following:
- Check the circuit breaker has not tripped
- Ensure the power outlet your Shark vacuum is plugged in works
- Check that your Shark vacuum battery is not flat
- Empty the dust cup
- Remove clogs from the hose
- Unclog the brush roller
- Wash or replace your Shark vacuum filter/filters
- Replace a damaged power cord
- Test your Shark vacuum switch
- Clean your Shark vacuum motor
And if none of the steps above worked, don’t go bid farewell to your old Shark vacuum just yet!
Contact Shark/a professional to evaluate the situation.
If you do need to upgrade to a new model, make sure to do your homework and find a vacuum that will stand the test of time 🙂