If you own a Roborock robot vacuum, you may have encountered the frustrating issue of it not charging properly. This can be caused by a variety of factors, such as a poor connection between the charging contacts on the robot and the charging base pins due to an accumulation of dust. Fortunately, there are simple solutions to this problem that can help you get your Roborock back up and running in no time.
One of the first things to check when your Roborock is not charging is the cleanliness of the charging contacts. Over time, these contacts can become dirty and covered in dust, which can interfere with the charging process. To fix this, simply wipe the charging contacts on both the charging base and the robot with a clean, dry cloth.


If cleaning the charging contacts doesn’t solve the problem, there may be an issue with the charging base or the robot itself. In this case, it may be necessary to contact Roborock support for further assistance. With a little troubleshooting and some help from the experts, you can quickly resolve any charging issues and get back to enjoying the convenience of your Roborock robot vacuum.
Understanding the Roborock Charging Process
Roborock robot vacuums are designed to automatically return to their charging dock when they need to recharge. The charging process is straightforward, but there are a few things to keep in mind to ensure your Roborock charges properly. In this section, we’ll take a closer look at the Roborock charging process and some common charging issues.
Charging Dock
The charging dock is an essential component of the Roborock charging process. It provides power to the robot vacuum and allows it to charge its battery. The charging dock also serves as a storage space for the Roborock when it’s not in use.
Indicator Light
The indicator light on the charging dock is an important feature that helps you monitor the charging status of your Roborock. When the robot vacuum is charging, the indicator light will be solid. If there’s an issue with the charging process, the indicator light will flash, indicating that there’s a problem that needs to be addressed.
Charging Issues
If you’re experiencing charging issues with your Roborock, there are a few things you can do to troubleshoot the problem. First, make sure the charging dock is plugged in and turned on. Next, check the charging contacts on both the robot vacuum and the charging dock to make sure they’re clean and free of debris. If the contacts are dirty, use a soft cloth to clean them.
If you’re still having charging issues, try resetting the robot vacuum by turning it off and on again. If none of these steps resolve the issue, it’s possible that there’s a problem with the battery or the charging dock. In this case, you may need to contact Roborock customer support for assistance.
Conclusion
Understanding the Roborock charging process is essential to ensure that your robot vacuum stays charged and ready to clean. By keeping the charging dock clean and monitoring the indicator light, you can ensure that your Roborock is charging properly. If you’re experiencing charging issues, follow the troubleshooting steps outlined in this section to resolve the problem.
Common Reasons Why Your Roborock is Not Charging
If your Roborock is not charging, there could be several reasons behind it. Here are some common reasons why your Roborock is not charging:
Dirty Charging Contacts
One of the most common reasons why your Roborock is not charging is because the charging contacts are dirty. Over time, dust and dirt can accumulate on the charging contacts, preventing the robot from charging properly. To fix this issue, you can use a dry cloth to gently clean the charging contacts on both the robot and the charging dock.
Charging Contacts Not Lining Up Correctly
Another reason why your Roborock is not charging could be that the charging contacts are not lining up correctly. This can happen if the robot is not properly aligned with the charging dock. To fix this issue, make sure that the robot is properly aligned with the charging dock.
The Charging Base is No Longer Working
If the charging contacts are clean and properly aligned, but your Roborock is still not charging, the charging base may be defective. To check if the charging base is working properly, try plugging it into a different outlet. If the charging base still does not work, it may need to be replaced.
The Battery is No Longer Able to Hold a Charge
If the battery is no longer able to hold a charge, your Roborock will not be able to charge properly. Over time, the battery may lose its ability to hold a charge, and it may need to be replaced. To check if the battery is the problem, try charging the robot with a different battery.


Damaged Motherboard
If none of the above solutions work, the motherboard may be damaged. This is a more serious issue and may require professional repair. If your Roborock is still under warranty, contact the manufacturer for assistance.
Error 13
If you see an Error 13 message on your Roborock, it means that there is a charging issue. This could be caused by any of the above issues, such as dirty charging contacts or a defective charging base. Try the solutions mentioned above to fix the issue.
By checking for these common issues, you can easily troubleshoot why your Roborock is not charging and get it back to cleaning your home in no time.
Examining the Charging Contacts
When your Roborock vacuum cleaner is not charging, one of the first things you should check is the charging contacts. These contacts are the metal pins that connect the vacuum cleaner to the charging dock. Over time, these contacts can become dirty or covered in dust, which can interfere with charging. Here are some steps you can take to examine the charging contacts and ensure they are clean and functioning properly:
- Turn off the Roborock and unplug the charging dock from the wall.
- Carefully remove the Roborock from the charging dock.
- Inspect the charging contacts on both the Roborock and the charging dock. Look for any signs of dirt, dust, or debris that may be interfering with the connection.
- Use a clean, dry cloth to wipe down the charging contacts on both the Roborock and the charging dock. Be sure to remove any dirt or debris that may be present.
- Reconnect the Roborock to the charging dock and plug the dock back into the wall.
- Turn on the Roborock and check to see if it begins charging.
If the Roborock still does not charge after examining the charging contacts, there may be other issues at play. However, cleaning the charging contacts is a simple and effective first step that can often resolve the problem.
It’s important to note that the charging contacts are not the same as the sensors that detect when the Roborock is on the charging dock. These sensors are typically located on the bottom of the Roborock and the charging dock, and they use infrared technology to detect when the vacuum cleaner is properly positioned on the dock. While these sensors can also become dirty over time, they are not directly related to the charging process.

In summary, examining the charging contacts is a crucial step in troubleshooting a Roborock vacuum cleaner that is not charging. By cleaning these contacts and ensuring they are free from dirt and debris, you can often resolve the issue and get your vacuum cleaner back up and running in no time.
Checking the Charging Dock and Cable
If your Roborock is not charging, the first thing you should check is the charging dock and cable. Here are some steps you can take to troubleshoot the issue:
- Check the Dock: Ensure that the charging dock is properly plugged into an outlet and that the power cord is securely connected to the dock. Make sure that the charging slot on the dock is free from any debris or dust that could interfere with the charging process.
- Check the Cable: Inspect the power cord for any signs of damage or wear and tear. If the cable is damaged, it may need to be replaced. Additionally, make sure that the cable is not twisted or tangled in any way, as this could prevent the Roborock from charging.
- Check the Outlet: Try plugging the charging dock into a different outlet to see if the issue is with the outlet itself. If the Roborock charges when connected to a different outlet, then the problem may be with the original outlet.
- Reset the Dock: If the above steps do not solve the issue, try resetting the charging dock by unplugging it from the outlet and plugging it back in after a few minutes. This can sometimes help to resolve charging issues.
By following these steps, you should be able to determine whether the issue is with the charging dock or cable. If the problem persists, it may be necessary to contact Roborock customer support for further assistance.
Looking at the Battery and its Lifespan
The battery is a crucial component of the Roborock vacuum cleaner, and it powers the device for its cleaning tasks. The Roborock S5 uses a lithium-ion battery that has a limited lifespan. Here are some important things to know about the battery and its lifespan.
Battery Life
The battery life of the Roborock S5 can vary depending on usage, cleaning frequency, and other factors. Generally, the battery can last up to 150 minutes on a single charge, which is enough to clean a large area. However, if the battery is old or has been used extensively, it may not hold a charge for as long.
Low Battery
When the battery level is low, the Roborock S5 will automatically return to its charging dock to recharge. If the battery is not holding a charge, it may be time to replace it. It is important to note that the battery is not user-replaceable, and it requires professional service to replace it.
Lifespan
The lifespan of the battery is limited, and it will eventually need to be replaced. The lifespan of the battery depends on several factors, including usage, charging habits, and storage conditions. Generally, the battery can last for up to 500 charging cycles before it needs to be replaced.


Replacement
If the battery is no longer holding a charge or has reached the end of its lifespan, it will need to be replaced. The replacement battery is available from the manufacturer or authorized dealers. It is important to use only genuine Roborock replacement batteries to ensure compatibility and performance.
In conclusion, the battery is an essential component of the Roborock vacuum cleaner, and it has a limited lifespan. It is important to take care of the battery and follow the manufacturer’s recommendations for charging and storage to prolong its lifespan. If the battery is no longer holding a charge or has reached the end of its lifespan, it will need to be replaced with a genuine Roborock replacement battery.
Troubleshooting the Roborock Not Charging Issue
If you’re experiencing issues with your Roborock not charging, there are a few troubleshooting steps you can take to resolve the problem. Here are some common causes and solutions to help you solve the issue:
Check the Base Connectors
The first step is to check if the base connectors of the Roborock are clean. These connectors are what connect the Roborock to the charging dock. If they are not clean for some reason, then the dust and dirt could interfere with charging. Clean the connectors with a soft cloth to remove any dirt or debris.
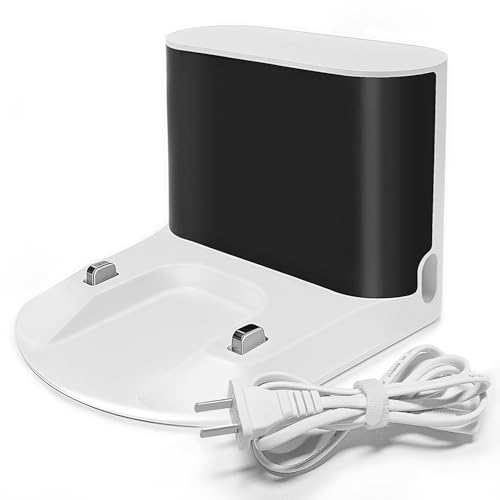
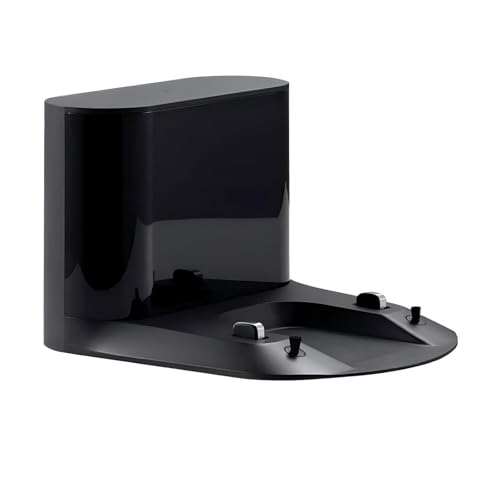
Check the Charging Contacts
You’ll see two metal sensors if you check the Roborock charging dock. When you flip your robot, you’ll see similar charging sensors on the back. These sensors connect with the robotic cleaner and pass the electricity. Because your robot deals with dust particles, these sensors get dirty over time. Clean the charging contacts with a soft cloth to remove any dirt or debris.
Check the Charging Base
If the base connectors and charging contacts are clean, the next step is to check the charging base. Make sure the base is plugged in and the power outlet is working. If the base is no longer working, you may need to replace it.
Check the Battery
If the base and connectors are working correctly, the issue may be with the battery. Over time, batteries can lose their ability to hold a charge. If the battery is no longer able to hold a charge, you may need to replace it.
Check for Overcharging
If your Roborock is overcharging, it could cause the battery to fail. To avoid overcharging, make sure you’re using the correct charging dock and that the battery is not left on the dock for an extended period.
Check the Settings
If you’re still experiencing issues with your Roborock not charging, it’s worth checking the settings on the device. Make sure the device is set up correctly and that the charging settings are configured correctly.
By following these troubleshooting steps, you should be able to identify and fix the issue with your Roborock not charging. If the problem persists, it’s best to contact the manufacturer for further assistance.
Dealing with a Defective Component or Hardware Issue
If you have tried all the previous troubleshooting steps and your Roborock is still not charging, it is possible that you are dealing with a defective component or a hardware issue. This can be frustrating, but there are a few things you can do to try and resolve the issue.
First, check to see if there are any visible signs of damage to the charging dock or the robot itself. If you notice any cracks, dents, or other physical damage, this could be the cause of the problem. In this case, you may need to replace the damaged component.
If you suspect that the issue is with a defective component, such as the motherboard, you may need to contact Roborock customer support for assistance. They can help you diagnose the problem and determine if a replacement part is necessary.
It is also possible that the issue is with the power source, rather than the robot itself. Try plugging the charging dock into a different outlet or using a different power cord to see if this resolves the issue.
In some cases, a hardware issue may require professional repair. If your Roborock is still under warranty, contact the manufacturer for assistance. If not, you may need to find a reputable repair service in your area.
Dealing with a defective component or hardware issue can be frustrating, but by following these steps and seeking assistance when necessary, you can get your Roborock back up and running in no time.
When to Contact Customer Support or Claim Warranty
If your Roborock vacuum cleaner is not charging despite trying all the troubleshooting methods, it might be time to contact customer support or claim warranty. Here are some scenarios when you should consider reaching out to Roborock’s customer support team:
- Check the Charging Contacts: If the charging contacts are dirty or damaged, you may need to clean them or replace them. However, if the charging contacts are intact and clean, but the robot is still not charging, it might be a sign of a more serious issue.
- Indicator Light Not Turning On: If the indicator light on the charging dock is not turning on when the robot is docked, it could indicate a faulty charging dock or a damaged motherboard.
- Persistent Charging Issues: If you have tried all the troubleshooting methods, and your Roborock vacuum cleaner is still not charging, it might be a sign of a more serious problem. In such cases, it is recommended to contact customer support or claim warranty.
If you are unsure whether your Roborock vacuum cleaner is still under warranty, you can check the warranty period on the Roborock website. You will need to provide the serial number of your device to check the warranty status.
When contacting customer support, make sure to provide them with as much information as possible about the issue you are facing. This will help them diagnose the problem more accurately and provide you with a solution quickly.
In case your Roborock vacuum cleaner is still under warranty, and the issue is covered under warranty, you can claim warranty. However, if the issue is not covered under warranty, you may need to pay for the repair or replacement of the device.
Overall, if you have tried all the troubleshooting methods and your Roborock vacuum cleaner is still not charging, it is recommended to contact customer support or claim warranty. This will help you get your device up and running quickly and efficiently.
Exploring the Roborock Models: S5 and S7
Roborock is a well-known brand in the world of robot vacuum cleaners, and their S5 and S7 models are two of their most popular offerings. Both models have their unique features and functionalities that make them stand out from the rest of the robotic vacuum cleaners in the market.
Roborock S5
The Roborock S5 is a robot vacuum cleaner that comes with a range of features that make it an excellent choice for those who are looking for a reliable and efficient cleaning device. This model has a powerful suction capability that allows it to pick up dirt, debris, and pet hair from carpets and hard floors with ease. It also comes with a large dustbin that can hold up to 480ml of dirt, which means you won’t have to empty it frequently.
One of the standout features of the S5 is its mapping and navigation system. It uses laser technology to create a map of your home, which it uses to plan its cleaning route. This means that it can clean your home in a more efficient and systematic way, without missing any spots.
Roborock S7
The Roborock S7 is the latest model from the brand, and it comes with several upgrades and improvements over its predecessor. This model also has a powerful suction capability, which is further enhanced by its sonic mopping feature. The sonic mop vibrates at a high frequency, which helps to loosen and remove even the most stubborn dirt and stains from your floors.
The S7 also has an improved mapping and navigation system, thanks to its upgraded LiDAR technology. This allows it to create a more accurate map of your home and plan its cleaning route more efficiently. The S7 also comes with an intelligent carpet detection feature, which allows it to automatically adjust its suction power when it detects a carpet.
Overall, both the Roborock S5 and S7 are excellent robot vacuum cleaners that offer a range of features and functionalities that make them stand out from the rest. Whether you’re looking for a reliable and efficient cleaning device for your home, these models are definitely worth considering.
Maintaining Your Roborock for Optimal Performance
To ensure that your Roborock robot vacuum performs at its best, it’s important to maintain it regularly. Here are some tips to help you keep your Roborock in top condition:
Cleaning the Robot Vacuum
Cleaning your robot vacuum is an essential part of maintaining it. Make sure to empty the dustbin regularly and wipe down the sensors and charging contacts with a clean, dry cloth. This will prevent dust and debris from interfering with the robot’s performance and ensure that the charging contacts are clean and free of debris.
Wiping the Floors
Roborock vacuums are designed to clean floors, so it’s important to keep them clean as well. Wipe down the floors regularly to remove any dirt or debris that might interfere with the robot’s cleaning performance. This will also prevent any scratches or damage to the floors.
Checking the Charging Contacts
Make sure that the charging contacts on the robot and charging dock are aligned correctly. If they are misaligned, the robot may not charge properly. Additionally, make sure that the contacts are clean and free of debris. This will ensure that the robot charges properly and has enough power to clean your floors.
Updating the Software
Roborock regularly releases software updates to improve the performance of their robot vacuums. Make sure to update your robot’s software regularly to ensure that it’s running at its best. You can check for software updates in the Roborock app.
By following these simple maintenance tips, you can ensure that your Roborock robot vacuum performs at its best and keeps your floors clean.
Frequently Asked Questions
How do I know if my Roborock is charging?
When your Roborock is charging, the battery indicator light on the robot will flash slowly. Once the battery is fully charged, the light will turn off. You can also check the charging base to see if the indicator light is on.
Why is my Roborock not turning on?
If your Roborock is not turning on, it could be due to a dead battery or a faulty power connection. Check to make sure the robot is properly connected to the charging base and that the base is plugged into a working outlet. If the battery is fully charged and the robot still won’t turn on, there may be a hardware issue that requires professional repair.
Why is my robot mop not charging?
If your robot mop is not charging, it could be due to a dirty charging contact or a faulty charging base. Make sure the charging contacts on both the robot and the base are clean and free of debris. If the problem persists, try using a different outlet or replacing the charging base.
How long can Roborock battery last?
The battery life of a Roborock can vary depending on usage and environmental factors. On average, the battery can last up to 150 minutes on a single charge. However, this can be affected by factors such as the type of flooring, the amount of dirt and debris, and the cleaning mode.
What should I do if my Roborock is not charging?
If your Roborock is not charging, there are several things you can try. First, make sure the charging contacts on both the robot and the base are clean and free of debris. If that doesn’t work, try using a different outlet or resetting the robot. If the problem persists, there may be a hardware issue that requires professional repair.
How can I troubleshoot Roborock charging issues?
If you’re experiencing charging issues with your Roborock, there are a few things you can try. First, make sure the charging contacts are clean and properly aligned. If that doesn’t work, try resetting the robot or replacing the charging base. If none of these solutions work, there may be a hardware issue that requires professional repair.