Kirby vacuums have been around since 1925 and have an excellent reputation when it comes to longevity.
However, that does not mean they are indestructible!


Even these amazing machines can have issues, including overheating.
Luckily, most of the time, fixing a Kirby vacuum that overheats is easy 🙂
In this post you will learn:
- Why your Kirby vacuum is overheating
- How to fix a Kirby vacuum that gets too hot
- And more!
Why Is My Kirby Vacuum Overheating?
Overheating may be caused by a blockage in your Kirby vacuum, such as a full dust bag, clogged hose, or debris stuck in the brush roll. It can also be caused by a broken cooling fan, belt or motor. The temperature limiter switch of an overheated Kirby vacuum will normally shut the machine off to prevent further damage.
How Do You Fix A Kirby Vacuum That Overheats?
For safety reasons, always take the following steps before attempting to fix your overheating Kirby vacuum:
- Turn off your vacuum
- Unplug it
- Let it cool down for at least 30 minutes.
Kirby vacuum cleaners come with a temperature limiter switch that shuts off the vacuum if it goes over the safe temperature threshold.
Thermal limit switches can easily break if not taken care of, so make sure you promptly fix whatever is causing your Kirby vacuum to overheat.
When the temperature limiter switch kicks in, your vacuum will need to cool down for at least 30 minutes.
Once your Kirby vacuum has cooled down, follow the steps below:
1. Replace The Filter Bag
You may think this is a pretty obvious thing to do.
But you’d be surprised at how many people forget to change their Kirby filter bag when it is full!
Kirby makes it really easy for customers to understand when the filter bag needs to be replaced, as these bags feature a fill line that indicates when it is time to change them.


Watch out for dirt reaching the fill line and refrain from continuing to use the full bag, as this will no longer filter properly.
A couple of things you should know about Kirby dust bags:
- The average cost for a pack of 6 bags is $20
- If you use your Kirby vacuum for regular, every day type of cleaning, the bag should last for 1 month
Obvious initial signs of a full dust bag include:
- Loss of suction power
- Debris being left behind as you vacuum

2. Remove Clogs
Check for potential obstructions in the vacuum head.
If your Kirby vacuum is overheating while using the hose or extension wand, make sure you unclog them.
To remove clogged debris in the vacuum head:
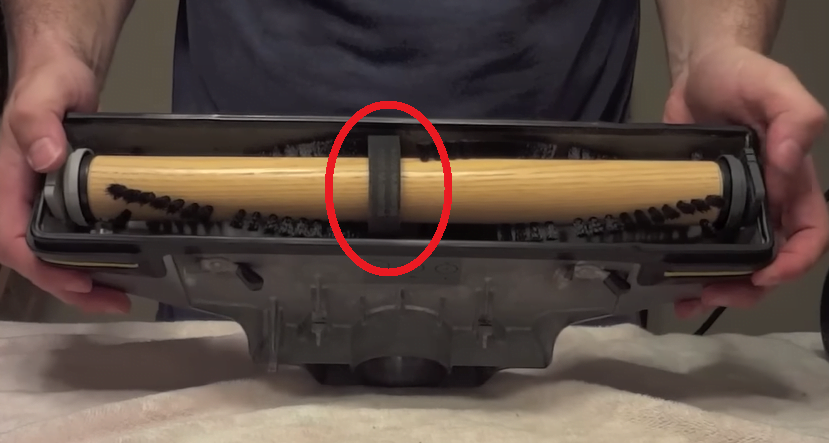
Floor heads mainly get clogged due to long hair wrapping around the brush roll.


When your Kirby vacuum brush is not spinning freely, it will put a strain on the vacuum motor, causing the machine to overheat.
- Lift the cover at the top of the head (where the head connects to the rest of the vacuum)
- Turn the front panel all the way around until the belt comes off
- Release the latch that keeps the vacuum head attached to the rest of the vacuum
- Detach the vacuum head
- Undo the two latched underneath the vacuum head (this allows the soleplate to come off)
- Remove the roller brush
- Use your hands or grab a pair of scissors to remove the hair wrapped around the roller brush
- Wash the brush with warm water
- Let the brush air dry
- Re-install the roller brush, ensuring that everything clicks into place
Here is a video from MegaSafetyFirst on how to clean a Kirby brush roller:
To remove a blockage from your Kirby hose or extension wand:
- Detach the hose/extension wand from your Kirby vacuum
- Grab a long object, such as a broom handle, to dislodge any clogs present.
You may also want to wash the hose every couple of months or so:
- Fill the sink with enough water to completely submerge the hose
- Add dish soap or mild detergent
- Let the water run through the hose
- Use a cloth to clean the outer part of the hose
- Let the hose dry completely before re-attaching it to your Kirby vacuum cleaner
Here is a video from HooverLux Restorations that shows how to wash a vacuum hose:
3. Wash/Replace Filters
Kirby vacuum cleaners do not feature the typical pre-motor and post-motor filters you may see in other vacuum brands.
In fact, Kirby vacuums’ filtration is usually managed by the dust bag.
Some Kirby models do also come with a screen filter or a foam filter.


For example, the Kirby Sentria and Kirby Ultimate G come with a screen filter that needs to be replaced when worn out.
Foam filters, on the other hand, need to be washed every 3 to 6 months depending on use, or replaced if looking worn out.
Check your user manual to see if your Kirby vacuum uses filters other than the filter bag.
4. Inspect The Belt
Kirby vacuum belts enable the brush roller to spin and collect debris on carpets.
A broken belt can result in strain on the motor, causing your Kirby vacuum to overheat.
Generally, a belt would break due to large debris clogging the brush and, as a result, putting too much resistance on the belt.
Check your Kirby manual to see where your vacuum belt is located.
Inspect the belt and replace if needed, ensuring you purchase the correct belt for your machine.
5. Inspect The Power Cord
Another possible reason why your Kirby vacuum is overheating is a damaged power cord.
Inspect the power cord for loose wires or cracks and stop using your Kirby vacuum cleaner if you see any damage.
Watch this video by My White Whale to learn how to replace a Kirby vacuum power cord:
6. Replace The Cooling Fan
A broken cooling fan will make it difficult for the excessive heat to be expelled out of your Kirby vacuum.
To replace the fan:
- Remove the bag and handle
- Pull out the trim around the Pivot handle
- Remove the Metal Body
- Remove the Front Fan Cover Plate
- Pull out the old fan
- Install the new fan
- Follow the steps in reverse to put everything back together
Here is a video by Kirby Enthusiast showing you how to replace the cooling fan:
7. Contact a Professional To Inspect The Motor
Unfortunately, replacing a broken motor can be challenging for some and even dangerous if you do not know what you are doing.
For this reason, I recommend you contact a professional, so that they can inspect your Kirby vacuum and determine whether the motor needs to be replaced.
Before taking your Kirby vacuum to an independent professional, you may want to check the date you purchased your machine, as it may still be under warranty.
Kirby vacuum cleaners come with a 3 year limited warranty for registered owners.
Here is how Kirby would take care of your vacuum:
- Disassemble the machine, clean, repair or replace any parts
- Sandblast, polish and buff metal parts back to a shiny new appearance
- Inspect and repair the inside of the vacuum
- Test your Kirby to the same standards required as when it was first manufactured
Contact Kirby to see if they can fix/replace your vacuum cleaner.
Conclusion
Knowing what to do when your Kirby vacuum cleaner overheats can potentially save you hundreds of dollars!
Make sure you act quickly and go through the steps mentioned above.
To recap:
- Replace your Kirby filter bag
- Remove clogs from the hose, extension wand, and brush roll
- Clean or replace your filters (if applicable)
- Inspect the belt and replace it if needed
- Replace the power cord
- Replace the cooling fan
- Call Kirby or an independent professional to check if the motor needs to be replaced